
The quick fix express tutorial
- Jul 2, 2015
- 3 min read
I know this might sound weird, but I feel like a junkie these days. I haven't sat down to sew in so long (maybe a week or so, but that's like ages for a quilter), so yesterday I went down during naptime and decided on a super quick project, just for the satisfaction of having something done quickly.
I am using the Hometown by Saltlake - Moda charm pack I won from Erica Jackman from Kitchen Table Quilting during this year's Sew Mama Sew Giveaway. I quickly designed my idea on EQ7, which I'll show how to if you want to follow along. I'm calling it an express tutorial, because it's a quick overview of the process.


I made a wide design and a longer design. This was very quick and easy to do. I know that I am using 5" charms, so I designed a block on EasyDraw sized 4.5" wide by 6.5" long, which will be my finished size, after it's all sewn. Since I know that my charm will finish at 4.5" square, I'll add my line at the 4.5" mark. It's 6.5" long because I am adding a 2.5" background piece at the bottom, so 5" + 2.5" = 7.5" - 0.25"x2 = 7", then minus another 0.5" to sew it all together, the block will finish at 4.5" x 6.5". Save block by clicking on the red arrow button.

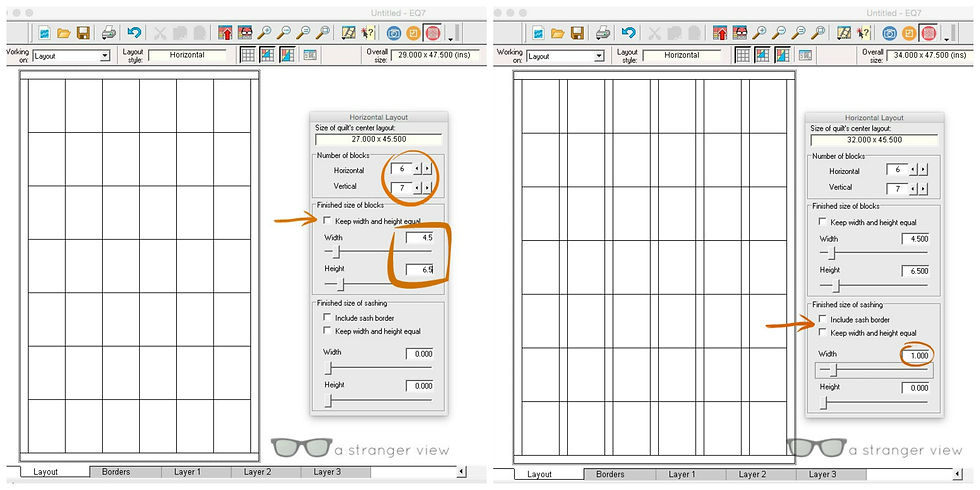
That's it. One line. So easy. So, next step is to go to Quilt layout. Click: New Quilt - Horizontal. Then click on the Layout tab on the bottom. Change number of blocks Horizontal to 6, and Vertical to 7. (left)
Next, is the Finished size of blocks. Uncheck the box that says Keep width and height equal and change the width to 4.5 and height to 6.5. (left)
Uncheck Finished size of sashing boxes and just move the width to 1.0. (right)
To add the borders/negative space, click on the Border tab on the bottom. Make sure the Border size and style is set to Long Horizontal and the All box for Lock size adjustments is checked. I did my border at 4.75 because I am keeping it simple and doing all my cutting at 5". When the All box is set, you just need to set one side measurement and all other sides will follow. If you want uneven borders, then do NOT click the All box or the L+R and T+B. This way you can set each side a different width.

Moving on to Layer 1, click on Set Block tool and place your block on the rectangle space by clicking on it. If you click while holding the Command button, then all the blocks will be filled.

Using the Rotate Block tool, double click on each block of every other column. You have to click twice because you want to rotate it at a 180º angle.

Then you can use the Paintbrush tool to fill in the color/fabric of your choice, and it should look like the designs on the top.
Super simple. Now, this is where I am at in real life. I still need to add the sashing and borders, plus join everything.

Here is where I need your help. I can't decide on a square layout or a rectangle layout. What do you think? Leave me a comment with your choice. Also, if you have a shortcut or better way to do things on EQ7, please do share. I am still new to the software, but thought this could help another EQ7 newbie out there.
I am planning on doing another express tutorial on sewing that quilt - hopefully soon.
xo, S.


Comments